1. Home
  2. Installations
  3. Garage door control

Installations

Garage door control with Shelly

Put an existing garage door on the app without touching the motor — and check what the door itself must have before it runs unattended.

Updated September 2026

Introduction

A Shelly relay turns almost any existing garage door opener into a remotely controllable door. Wire the relay in parallel with the existing wall button and trigger a short pulse, and you can open or close the door from the Shelly Smart Control app, a schedule or an automation — without modifying the motor.

Installation

Follow the steps in order — step 4 is the one most installations get wrong.

1
Hardware

Choose the relay

The Shelly 1 Gen4 is the recommended choice, because it accepts the Shelly Plus Add-On and can therefore read a reed switch for open/closed status.

It supports 12 V DC, 24–48 V DC and 110–240 V AC, which covers virtually every opener on the market.

Where status monitoring is not needed, the Shelly Plus Uni, Shelly 1 Mini Gen4 and Shelly Pro 1 all work.
2
Wiring

Wire in parallel with the wall button

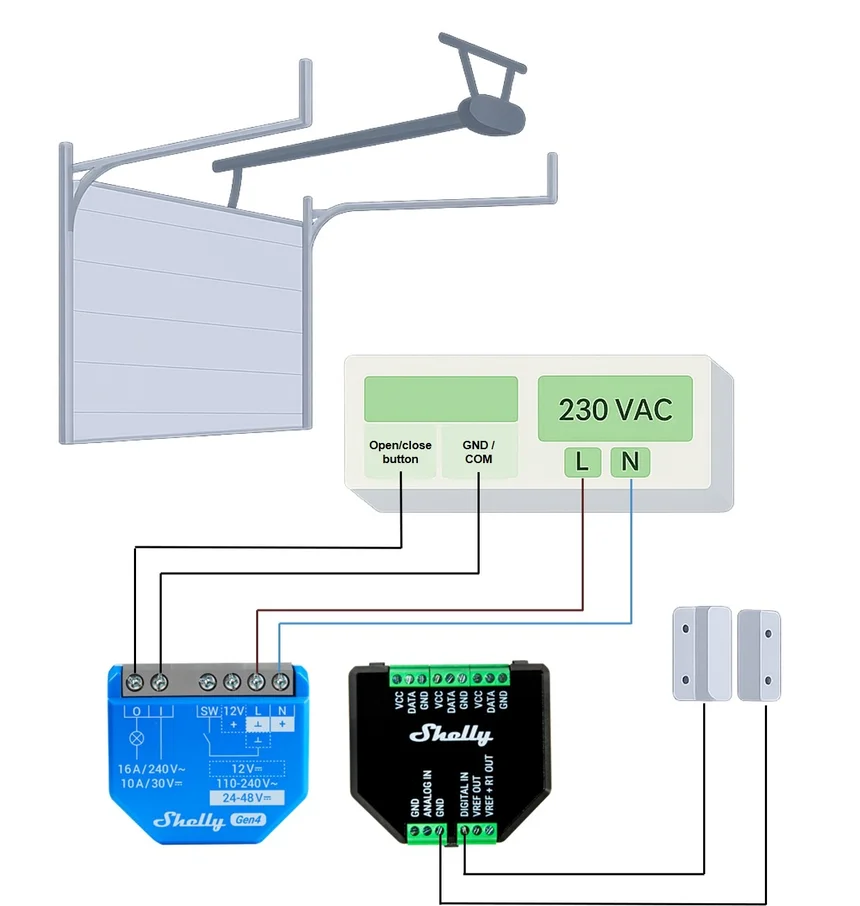
The relay’s potential-free output connects in parallel with the existing wall button. Both then work — the Shelly does not replace the button.

L
Line in, or DC positive for a 12–48 V opener
N
Neutral, or DC return
O
Potential-free output — to the opener's trigger input
I
Potential-free common — to the opener's trigger input
Shelly 1 Gen4 wired in parallel with the existing wall button on a garage door opener
The motor's main supply is left untouched. The diagram shows 230 V AC, but the principle is identical for 12 V and 24 V DC — only the supply terminals change.
3
Sensor

Add a door sensor

Optional, but it changes what the app can tell you. Without a sensor the app reports that a pulse was sent; with one it reports whether the door is actually open.

Wired — Shelly Plus Add-On and a reed switch

Connect a magnetic reed switch to the Shelly Plus Add-On, which plugs into the Shelly 1 Gen4. Mount the switch on the door frame and the magnet on the door. This is the option that can be configured as a Garage Door type in the app, with the matching icon.

Wireless — Shelly BLU Door/Window

Battery-powered on a CR2032, no wiring, connects over Bluetooth to a Shelly gateway device. It shows open/closed status, but it cannot be linked to the relay as a garage door controller, so you lose the combined tile in the app.

4
App setting

Set the Auto-Off Timer

An opener expects a momentary pulse, exactly like a press on the wall button. Without an Auto-Off Timer the relay stays closed, the opener will not behave correctly, and the motor can be damaged.

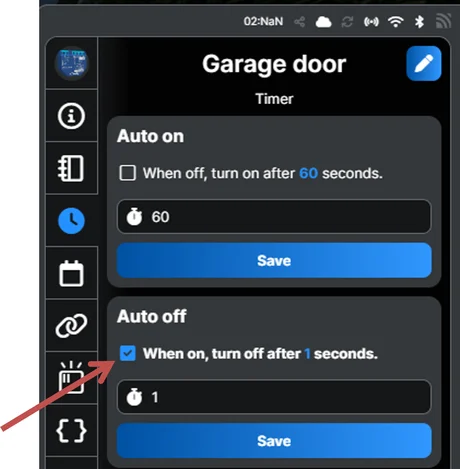
  1. Open the Shelly 1 Gen4 in Shelly Smart Control
  2. Go to Timer settings
  3. Enable Auto-Off
  4. Set the duration to 1 second
Timer settings in the app with Auto-Off enabled and set to one second
The relay closes briefly and opens again, mimicking a press on the wall button.
5
App setting

Configure the sensor

With the Plus Add-On and a reed switch fitted:

  1. Open the Shelly 1 Gen4 in the app
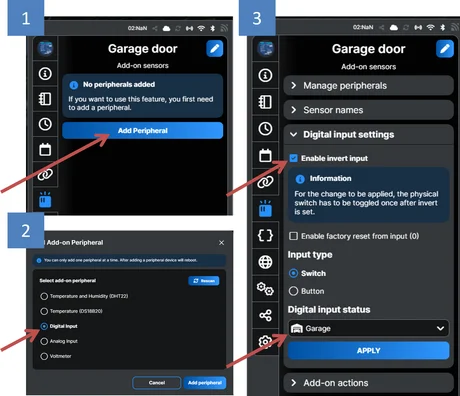
  2. Tap Add peripheral and select Digital input
  3. Once the device has rebooted, open Peripheral settings
  4. Enable Invert input
  5. Set Digital input type to Garage
Peripheral settings with Invert input enabled and Digital input type set to Garage
6
Test

Test and verify

Trigger the door from the app and confirm three things: the relay pulses for one second, the opener runs, and the sensor reflects the real door state afterwards.

Run the door through a full open and close cycle before you leave. A reed switch that is a few millimetres out of alignment reports correctly when the door is shut and never registers it as open.

Tips & best practices

  • Do not build an automatic close without photocells. An open-door warning is safe on any door; a schedule or automation that closes one is not, unless the door can detect what is underneath it.
  • Always wire in parallel with the existing wall button. Never interrupt the motor’s main supply.
  • Door not reacting? Check that Auto-Off is set to 1 second, and that you wired to the potential-free output, not the switched line output.
  • Status reversed? Toggle Invert input in the peripheral settings.
  • Warn about a door left open. An automation that notifies you after ten minutes open is the single most useful thing you can add here.
  • Share the door, not the account. User permissions in the app give family members access to the door alone.

Video tutorial

The full installation, from wiring in parallel with the wall button to setting the Auto-Off Timer.

Loads YouTube when you press play. Watch on YouTube

By ShellyGuide on YouTube

This video is in Danish. Auto-translated subtitles are available in the YouTube player settings.