- Home
- Installations
- IHC to Shelly conversion
Installations
IHC to Shelly conversion
Replace only the modules in the panel, and reuse the existing wiring and buttons.
Updated August 2026
Three methods
Each solves the same problem differently. None is universally right, and they are not exclusive — see the next section.
| Method 1 — wired | Method 2 — input/output | Method 3 — wireless buttons | |
|---|---|---|---|
| Existing buttons reused | Yes | Yes | No |
| Works without network | Yes | No | Partly |
| Flexibility to change later | Lowest | Highest | High |
| Programming needed | None for basic on/off | Yes | Yes |
| Where changes are made | In the panel, by wire | In software | In software |
Method 1 — wired latching relay
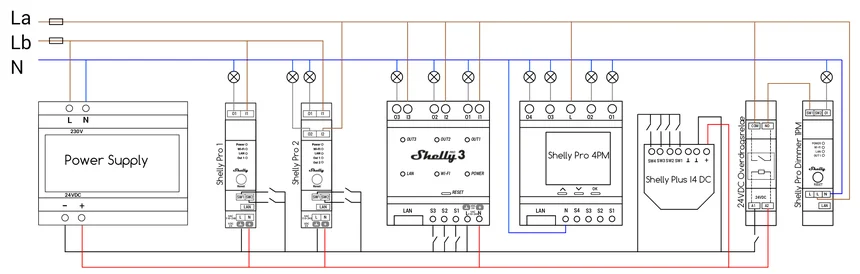
The input conductors are gathered and connected to the input that drives the output on the same device. The result is an installation that works purely by wire.
It is still smart: when the network is up, automations can run across devices, and lights can be grouped, scheduled and controlled from the app.
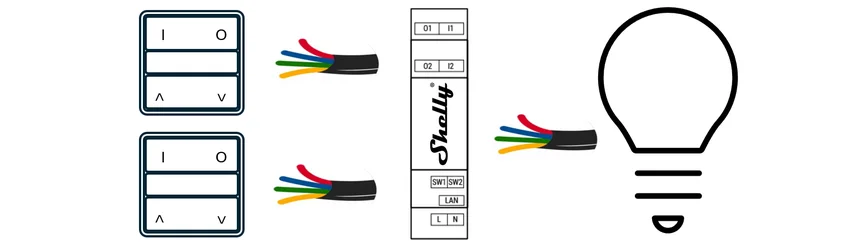
For it: basic on/off always works · no single point of failure · no programming for standard function. Against it: changes have to be made by rewiring in the panel · Pro 1, Pro 2 and Pro 3 give no power metering · panels in several locations may still need wireless links.
Method 2 — classic input/output
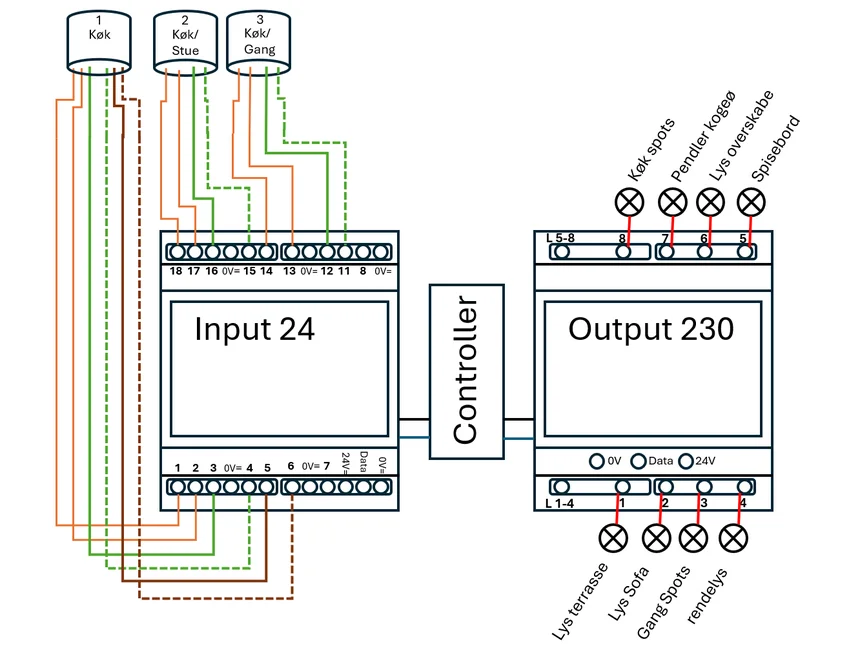
The same thinking as the original IHC installation: separate input modules and output modules. The difference is that the router — or the Shelly cloud — is now the hub instead of the IHC controller.
Which one is the hub depends on how you program it, and that decides where the weak link sits.
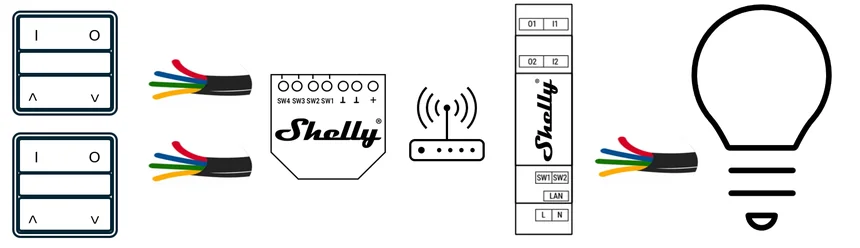
For it: very flexible · low voltage can stay separated · programming works across panels. Against it: depends on the local network or the internet · more programming · needs dedicated input devices.
Method 3 — wireless buttons
Shelly Bluetooth buttons replace the wall buttons, paired either through scenes in the app or directly device to device.
The existing buttons cannot be reused with this method — that is its one real cost.
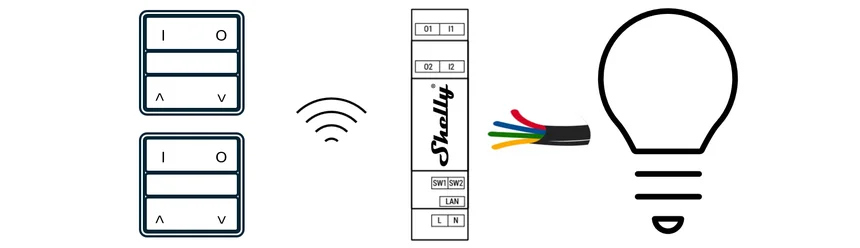
For it: works where no cable runs · power metering is available if PM devices are used. Against it: limited by radio range · needs programming · depends on the internet if scenes are used rather than direct pairing.
Combining the methods
This is the part most conversions get wrong by not considering it: the three methods mix freely, and a good installation usually mixes them.
Choose per circuit, not per house. A worked example from a real installation:
- Latching relays on the dimmers that only ever need simple on, off and dim from one button. Nothing to program, and it keeps working when the network does not.
- Input modules on the buttons used for scene control — the ones that should set a mood, run several lights at once, or do something different on a double press. That flexibility is worth the dependency.
- Wireless battery buttons where a new switch position is wanted and no cable runs there.
The result is that the circuits that must never fail do not depend on the network, and the circuits that benefit from intelligence get it. That is a better installation than either method applied uniformly.
The conversion calculator
Counting inputs, outputs and dimmer channels across a panel and turning that into a parts list is the slowest part of quoting this job.
Open the tool IHC to Shelly calculator Inputs, outputs and wireless buttons in — a complete parts list out. Opens on ihc-beregner.shelly.guide — opens in a new windowEnter the number of inputs, outputs and wireless buttons, and it produces a complete parts list you can save or print. It reflects our recommendations — other combinations work too, and it is a starting point rather than a specification.
Which device replaces what
The low-voltage side stays
IHC uses 24 V DC for its inputs. Several Shelly devices accept the same supply, so the existing power supply, the low-voltage wiring and the buttons can all be reused.
As an input module
Shelly Pro RGBWW PM — EAN 3800235268216. Five 24 V DC inputs.
It is sold as a 12–24 V LED controller, and it is an excellent one — but it is also the closest thing to a direct replacement for an IHC input module. Five inputs, reading short press, double press, triple press and long press.
The outputs do not have to be used. The inputs alone can drive relays and dimmers elsewhere on the network, which is exactly the IHC input-module role.
As input and output in one
Shelly Pro 1, Pro 2 and Pro 3 are DIN-rail relays with potential-free contacts and inputs on the same device, so one device replaces both an IHC input module and an output module.
| Device | EAN | Inputs | Outputs | Worth knowing |
|---|---|---|---|---|
| Shelly Pro 1 | 3800235268001 | 2 | 1 | Input 1 drives output 1. The second input drives nothing and can be programmed freely |
| Shelly Pro 2 | 3800235268025 | 2 | 2 | Four of these occupy the same width as one IHC 8-output module, and give 8 outputs |
| Shelly Pro 3 | 3800235268094 | 3 | 3 | Cheapest per output, but three modules wide |
Feeding the inputs from 24 V DC buttons has one significant consequence: the installation keeps working when the internet or the local Wi-Fi does not.
Programming
Where an input on one device controls an output on another, the link has to be made in software. Three ways, in increasing independence from anything outside the building:
Scenes in the app. Built in Shelly Smart Control or at control.shelly.cloud. The simplest to set up, and it requires an internet connection to work. See scenes and automations.
Local Network Messaging. Devices talk to each other over a multicast group on the local network — no internet, and no fixed IP addresses to maintain. This is the current recommendation for device-to-device control, and it replaces the older approach of sending HTTP commands to specific addresses. See dimming with an input module for a worked example.
A third-party platform. Home Assistant, Homey, KNX and others. Worth considering where the installation already has one.
Why this comes up
IHC is a Danish low-voltage control system, installed in more than 60,000 homes and now discontinued. Components are increasingly difficult to source, and an installation that loses a module can lose a whole floor’s lighting with no direct replacement available.
There is no one-to-one replacement on the market. What Shelly makes possible is replacing the input and output modules in the panel while keeping everything behind the wall: the 24 V low-voltage wiring, the existing buttons, and in most cases the power supply. The system changes from a data-bus architecture to a Wi-Fi one; the building’s wiring does not change at all.
That is the whole economics of the job. Rewiring a house is a different project with a different price.
Tips & best practices
- Survey before you quote. Count inputs, outputs and dimmer channels per panel. The calculator turns that count into a parts list; nothing turns a guess into one.
- Decide per circuit which method it gets. Anything that must work in a power cut or a network outage belongs on method 1.
- Check panel width early. Pro 3 is the cheapest per output and the widest. In a full panel that trade-off decides the design.
- Keep the existing power supply if it is healthy. It is already sized for the low-voltage side, and replacing it adds cost for nothing.
- Label the panel as you go. An IHC panel that has been converted looks nothing like the drawing on the door, and the next electrician will have only your labels to work from.
Video tutorial
A full conversion of a 24 V low-voltage installation, with what to watch for along the way.
Loads YouTube when you press play. Watch on YouTube
By ShellyGuide on YouTube
This video is in Danish. Auto-translated subtitles are available in the YouTube player settings.