Lighting control

Lighting control

With Shelly you can make your lighting smart, fast, simple and without any need for re-wiring. The retrofit Shelly-devices can be installed behind your existing wall switches or in the ceiling box. They all work completely offline and offer value-added features like power metering, night-mode, scheduling, scene control and much more.

Solution 1 - direct control

With direct control, you just need to install a Shelly Dimmer 2 behind your wall switch or in the ceiling box. The Dimmer 2 can be controlled from your existing wall switch and control your non-smart lighting.

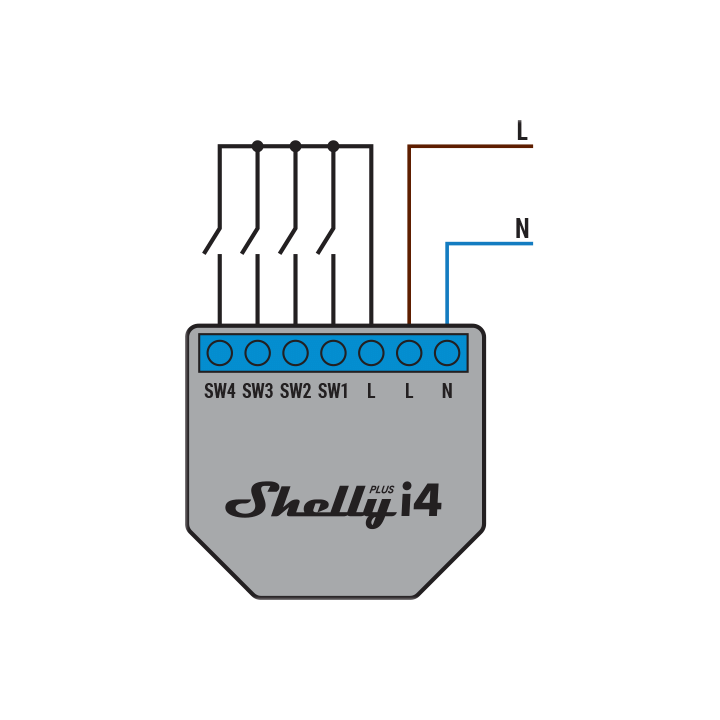
Solution 2 - wireless control

With this solution, you don't need any wiring from your wall switch to your ceiling light. Shelly Plus I4 is an input reader, that can read signals from your wall switch and in that way, make your existing wall switch intelligent and programmable. Shelly Dimmer 2 can then be installed in the ceiling box and receive commands from the Plus I4.

Solution 1: direct control

– More wiring diagrams can be found HERE.
– Getting startet guide (step 1, 2 & 4) can be found HERE.

  1. Download Shelly Smart Control app and create an account.
  2. Create your first room.
  3. Connect your Shelly Dimmer 2 according to the wiring diagram.
  4. Include your Shelly Dimmer 2 in the Shelly Smart Control app.
  5. Go to device settings and configure the device.

Device settings

Button type

Depending on the type of switch you have, you can change the button type settings.

  • One button mode: If you have a switch with a spring inside or are using push-button, this is the right setting to use. I recommend this type of installation and settings.
    • When you press the button/wall switch your light will change state.
    • If you hold the button, the light will dim down/up.
    • If you double-click the switch, the light will go to 100 %.
  •  Dual button mode: If you would like to control the light with two switches/buttons.
    • Input SW1: Turn on and brighten the light.
    • Input SW2: Turn off and dim the light.
  • Toggle switch: if you would like to use your normal wall switch. Dimming is not possible from the switch with this option, but you can use the app for this.
    • The light will follow the state of the wall switch. When on, the light will turn on and when the switch is turned off, the light will turn off.
  • Edge switch: if you would like to use your normal wall switch. Dimming is not possible from the switch with this option, but you can use the app for this.
    • The light will change every time you press your wall switch. This mode doesn’t follow the normal on/off state of the wall switch as toggle mode does.
  • Detached mode: This setting is used if you would like to use your inputs for controlling something different than the connected lights. It “disconnects” the input from the output.
  • Activation switch: use this setting if you would like to control your light from a PIR sensor.

Dimmer calibration

I recommend to run the auto calibration. It will try to detect the right type of load to set the best dimming settings. If the result is not satisfying you can try to set the dimming mode manually. A general recommendation:

  • LED lamps typically needs to be set to trailing edge.
  • Halogen and incandescent light bulbs should be set to leading edge.

Solution 2: wireless control

– More wiring diagrams for Shelly Dimmer 2 can be found HERE.
– More wiring diagrams for Shelly Plus I4 can be found HERE.
– Getting startet guide (step 1, 2 & 4) can be found
HERE.

  1. Download Shelly Smart Control app and create an account.
  2. Create your first room.
  3. Connect your Shelly Dimmer 2 to the lamp according to the wiring diagram.
  4. Connect your Shelly Plus I4 to the wall switch according to the wiring diagram.
  5. Include your Shelly Dimmer 2 and Plus I4 in the Shelly Smart Control app.
  6. Go to device settings and configure the device.

Device settings

Button type

Depending on the type of switch you have, you can change the button type settings of your Shelly I4.

  • Button: If you have a switch with a spring inside a push-button, this is the right setting to use. I recommend this type of installation and settings. This will give you four programming options:
    • 1 x short press
    • 2 x short press
    • 3 x short press
    • Long press
  • Switch: if you would like to use your normal wall switch. You will get two programming options with this mode:
    • When the swich is on
    • When the switch is off

Programming

Now, you need to program your devices. You have two options for programming:

  • DDD (Direct Device to Device communication). I recommend this type of programming as it works without internet (only local wifi is needed). The speed is also faster.
  • Using scenes. Very simple to use, but this type of programming requires internet connection. I will not cover the scene programming in this guide, but you can learn how to do it HERE.

To program your devices with DDD, you simply need to copy/paste and adjust these URL addresses into your Shelly Plus I4 device actions.

You can find more information about DDD programming HERE.

  1. Go to the actions tap in your Shelly Plus I4 device settings.
  2. Click on “add action”.
  3.  Go through the steps and select the condition matching to your button type.
  4. Add one of the following URL codes that matches the functionality you want. Remember to adjust the IP address to the IP of your Dimmer 2 (tip: set a static IP of your device).

Light on:
http://192.168.xxx.xxx/light/0?turn=on

Light off:
http://192.168.xxx.xxx/light/0?turn=off

Light toggle:
http://192.168.xxx.xxx/light/0?turn=toggle

Increase brightness
http://192.168.xxx.xxx/light/0?dim=up&step=30
Will increase brightness until another command is received.

Decrease brightness:
http://192.168.xxx.xxx/light/0?dim=down&step=20
Will decrease brightness until another command is received.

Stop dimming:
http://192.168.xxx.xxx/light/0?dim=stop

More actions can be found HERE.

If you want to make wireless dimming from a Shelly Plus I4, it is possible with a simple script. Follow this guide:
https://shelly.guide/wireless-dimming/